Whether preparing for Easter, adding decorative flair to a family brunch, or simply looking for a fun DIY project with the kids, dyeing eggs is always a creative and rewarding activity. While traditional liquid dyes are common, gel food coloring opens the door to vibrant, bold hues perfect for egg decorating. The best part? You don’t need to be a craft expert to pull it off!
This guide will teach you how to dye eggs with gel food coloring using simple techniques and supplies you likely already have at home. By the end, you’ll have beautifully dyed eggs, an exciting way to spend time with your family or add stunning touches to your food blog content.
Why Use Gel Food Coloring for Dyeing Eggs?

Before we get started, you might wonder why gel food coloring is worth trying. Here’s why it’s a favorite among DIY enthusiasts and food bloggers alike:
Vibrant Colors – Gel food coloring is more concentrated, delivering rich and vivid hues versus the diluted tones of liquid colors.
Easy to Work With – Its thick consistency makes it less messy, which is particularly helpful when working with kids.
Versatile – Gel food coloring is widely used in baking, so chances are you already have it in your pantry.
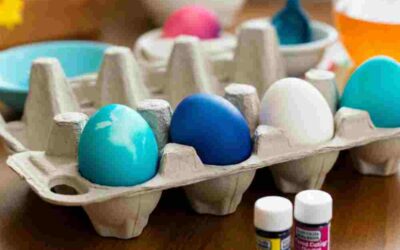
Looks great, right? Now, gather your supplies and let’s get started.
Supplies You’ll Need
Before you dye your eggs, make sure you have the following items on hand:
- Hard-boiled eggs (room temperature works best)
- Gel food coloring in your desired colors
- White vinegar
- Small bowls, cups, or containers
- Spoons or tongs
- Paper towels or an egg drying rack
- Rubber gloves (optional, but helpful for avoiding stained hands)
- A workspace protected with newspaper or a plastic tablecloth
Got everything? Perfect. Now, let’s start the fun!
Step 1: Prepare Your Eggs

Freshly boiled eggs are the foundation of your masterpiece, so get them ready:
Boil the Eggs: Place eggs in a saucepan, cover with cold water, boil, and cook for about 10 minutes. Immediately transfer to an ice bath to cool.
Dry Thoroughly: Allow your eggs to dry completely before dyeing. Dampness can dilute the coloring.
Pro Tip:
If you want flawless, smooth eggs, gently wipe any remaining residue off the shells with a damp paper towel before you begin.
Step 2: Create the Dye Mixtures
Here’s where the magic begins. Follow these steps to create your dye baths:
- Select your containers, ensuring they’re deep enough to submerge the eggs.
- Add ½ cup of warm water to each container.
- Mix in 1 teaspoon of white vinegar to the water. The vinegar helps the color adhere better to the eggshells.
- Squeeze a small amount of gel food coloring into the water. Start with about ⅛ teaspoon (a pea-sized amount). Stir until the gel dissolves, creating a gorgeous, vibrant dye bath. You can always add more for deeper tones.
Experiment with Color:
Want to get creative? Mix different gel colors to create unique shades. For example:
- Pink + a drop of blue = Lavender
- Yellow + red = Sunset Orange
Step 3: Start Dyeing the Eggs
The part you’ve been waiting for—dyeing the eggs! Use these steps to achieve beautiful, even results:
- Carefully place an egg into the dye bath, ensuring it’s fully submerged.
- Leave the egg in the dye for about 3-4 minutes for lighter shades. For bolder, more saturated colors, aim for 8-10 minutes.
- Turn the egg gently using a spoon or tongs to ensure even coverage.
Pro Tip:
If you want a marbled effect, lightly stir the dye while the egg is submerged.
Step 4: Dry and Display
Once your eggs are dyed to your liking, it’s time to dry and admire your work:
- Remove the eggs from the dye bath using tongs or a spoon.
- Place them on a drying rack or rest them on paper towels. If using paper towels, turn the eggs occasionally to avoid smudges.
- Allow the eggs to dry completely before handling them further or displaying them.
Creative Ideas for Decorating Dyed Eggs
If you want to kick it up a notch, here are some fun ways to decorate your eggs further:
Metallic Shine: Add edible metallic paint for a luxe touch.
Stickers & Patterns: Use stencils or stickers to create clean designs and patterns before dyeing.
Speckled Finish: Flick tiny drops of a darker color onto your dyed egg for a speckled design.
Kid-Friendly Add-On:
Have children draw fun shapes on the eggs using crayons before dyeing—the wax creates a resist effect, leaving behind white shapes!
Common Questions
Can I use brown eggs instead of white?
Brown eggs create a slightly muted, rustic look that many people love. Just know the colors won’t pop as vividly as they do on white eggs.
How do I avoid streaks or uneven coverage?
Ensure the water is warm and the gel entirely dissolves into the mixture. Also, dry the eggs thoroughly before dyeing.
Is gel food coloring safe to use?
Yes, gel food coloring is food-safe and non-toxic, making it perfectly safe for egg dyeing—even if you plan to eat the eggs later!
Can I mix different food coloring gels to create custom colors?
Absolutely! Mixing different gel food coloring can be fun and create unique shades. Start with small amounts and adjust the ratio until you achieve your desired color.
How long should I leave the eggs in the dye?
It’s best to leave the eggs in the dye for at least 5-10 minutes for more vibrant colors. Check periodically to ensure the color develops evenly.
What’s the best way to dry-dyed eggs?
After dyeing, place the eggs on a drying rack or a paper towel-lined tray. Be sure to gently turn them to avoid smudging the colors while they dry.
Can I use natural ingredients instead of gel food coloring?
You can use natural ingredients like beet juice, turmeric, or red cabbage to create beautiful, organic colors. However, natural dyes may produce softer, more muted tones.
Final Thought
Remember, dyeing eggs is not just about creating beautiful decorations—it’s also an opportunity to enjoy creativity and quality time with loved ones. Whether you use traditional methods or experiment with natural dyes, the process is as rewarding as the result. Have fun, and let your imagination guide you!
Plan Your Next Egg Dyeing Adventure
There’s something so satisfying about seeing your plain eggs transformed into bright, colorful masterpieces. Whether you’re sharing them with family, using them as festive decor, or documenting them on your food blog, dyed eggs bring joy and creativity to any occasion.
If you’re feeling inspired but unsure where to start, follow this step-by-step guide and see what you create! This is a fantastic hands-on activity for parents to share with kids, sparking curiosity and creativity as they mix and match colors.
Now, get your gel food coloring and start crafting those flawless eggs.


